New Dawn

I was excited to get reacquainted with my old pants post-partum. Many of my pants were excited to see me, too. However, several pairs will no longer know me, much in the manner of a cat after its person takes a vacation; but, since I’ve been wishin’ and hopin’ and thinkin’ about pants for the better part of the last year, it seemed like a marvelous excuse to sew new jeans anyway.

And because She’s Worth It, I also decided to use one of my two remaining pieces of US-produced Cone Mills denim. I think it’s 11 oz S-Gene in Indigo, and it was definitely a 1.5 yard cut. That’s how much denim I need to make a pair of Gingers – and when I ordered the denim in 2019, that was the only jeans pattern in my repertoire! My hopeful plan was to cut a pair of DJ Adams, to which the pattern’s yardage needs politely said hahaha very much no. Obviously I could have cut Gingers, but I felt like a different silhouette, so ultimately I chose the MN Dawns. It’s not a stretch pattern, but denim, even stretch denim, is pretty stable, so I wasn’t worried.

In fact, I prudently added an extra ¼” seam allowance to the outseams of my usual 14 waist, 16 hips (plus changes ahoy). That adds to the legs, pocket bag pieces, pocket facings, waistband, and yokes, so you best believe I wrote myself an all-caps Post-It (“ADD ¼!!!”) when I had to pause halfway through cutting and stuck it to the uncut paper pieces. I also extended the legs 1.5”, leaving only scraps of denim after cutting the straight-leg view.

I used a collection of quilting cotton leftovers for the pocket bags and inner waistband. In fact, this was a nothing-new-purchased project, which is why I have a button instead of a rivet. Actually, that’s a little disingenuous because of the denim, but it *was* a not-leaving-the-house project. By the way! Prewashing the denim in a baby laundry load dyed several of our diapers and burp clothes pale blue. Tasteful!

I was humming along sewing the front of the jeans when I realized I didn’t have any nine-inch zippers. I found a 7” metal zip buried in a box and resigned myself to using that instead. I always use 9” because it’s easier to sew without moving the pull up and down and out of the way, but as I discovered: moving the pull is actually pretty easy, too!

Plus, then I didn’t have to trim the tape to remove the metal teeth from inside the waistband. I’ll be buying 7” jeans zippers from now on – it takes  a few more seconds during installation, but the result is tidier and more durable.

I grew-on my fly extensions and used the Ginger jeans method as per ush. Linked every time because I love it.

When the time came I basted the side seams with a 5/8” seam allowance, tried on the unfinished jeans, and liked them! I might have gotten the same result by sewing the  un-added-to-version with 3/8” seam allowances, but it’s my unscientific, unsupported opinion that wide seam allowances, pressed open, help seams hang better.

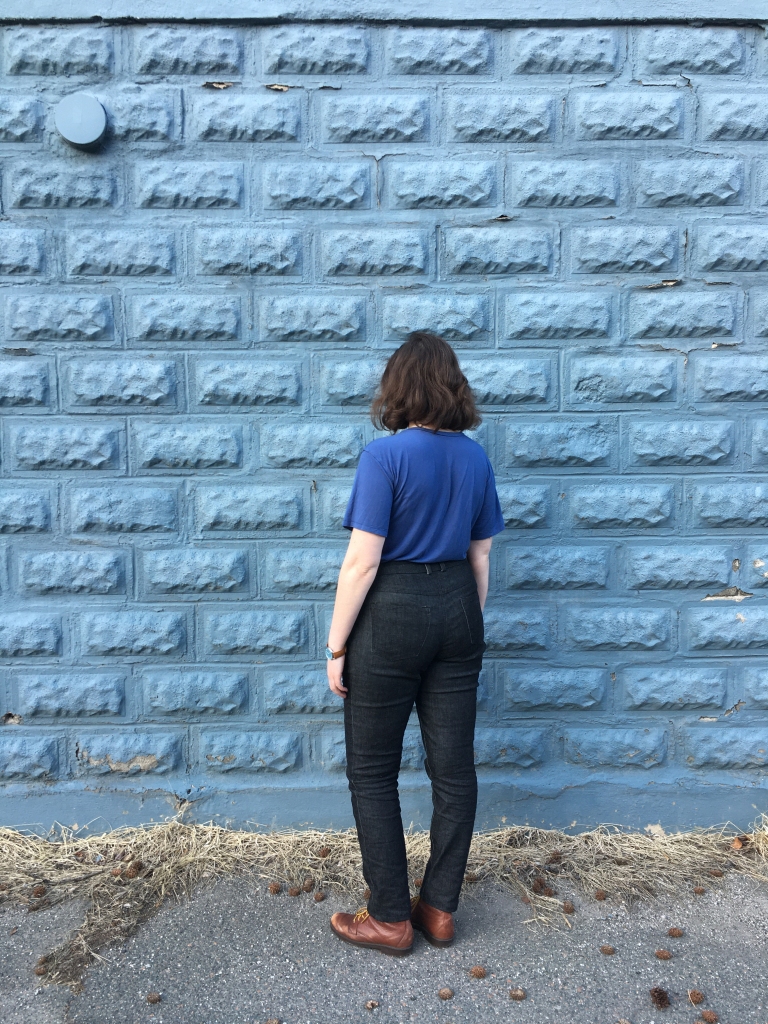
I even liked the fit enough to have Professor Boyfriend place the pockets on my behind and take photos to optimize their position, a step I usually skip (as is obvious from the many rear-view pictures in which I’m always getting it a little bit wrong). At one point he said doubtfully “These are big pockets”, but my feeling is, you don’t use a small paintbrush to paint a big wall. My pockets are ½” larger on each side than the pattern, and I also attach them with a reduced sa.

That was the last major decision, so I cruised happily towards the finish line by attaching an extremely tidy waistband and then…picture a dolly zoom* (*caution: Jaws) and me yelling “GET OUT OF THE JEANS”.

My waistband measurement hasn’t changed, but its position has. It’s higher now. I just hated how that waistband, at that longitude, made the jeans hang. Also the waistband itself was too tall for its new compressed space! Booo!

I ripped it out before I could change my mind. I didn’t have a ton of denim left but I wanted a skinner waistband anyway. So I replaced it and restored the fit I liked with, shocker, a 1” finished straight waistband.

Cast your eyes yonder eastward and you may spot the place where I had to piece it! I also sewed the new waistband facing from quilting cotton scraps. This time I cut the pieced scraps on the bias, partly out of a vague sense of “comfortable???” but also because I had cut some bias strips already and they were just sitting there. This waistband doesn’t crumple even after multiple wears, probably because the combined seam allowances are as wide as the band’s finished width. The jeans sit one smidge lower than I usually wear pants, so the crotch is longer and crinklier, but hopefully in a faux-vintage way.

Just for fun, I added a selvedge tag. I typically object to tags in homemade clothes, but I couldn’t resist this little doodad. Here’s how to convert a sassy selvedge design to a possible source of skin irritation:

  1. Gather your supplies – a bit of selvedge with extra fabric to the sides and above your chosen motif, plus a leftover scrap of fusible hem tape from some Ikea curtains you bought in 2010 (not pictured because it was invisible against a white background).
  2. Fold the fabric right-sides-together and sew, not too close to the motif. Try guessing. Try guessing right (recommended!). Trim seam allowances to ½ the width of your finished tag.
  3. Center and press seam allowances open.
  4. Using a tool or your fingers, turn the tag right-sides out. Again, using a tool or your fingers, pull an appropriately-sized scrap of hem tape into the tube and smooth it so it lays flat, filling the space.
  5. Press again with heat and steam to seal.
  6. (This step is optional.) Decide the proportions are a little weird because the diamond isn’t centered vertically and despite the fact that the whole point of the selvedge was the SELF-EDGE, whack off a bit with your shears. And install.

My favorite way to wear these jeans is with the legs pegged. They look pretty different with a regular cuff or uncuffed.

What with our wonderfully long cool rainy spring they’ve been worn a lot already! I’m very pleased to have such a useful new pair of pants from a well-seasoned piece of yardage, plus whatever else I had lying around.

Now I have to put some serious thought into shorts.

Pattern: MN Dawns

Pattern cost: NA

Size: 14 waist, 16 hips plus changes + additional ¼” outseam allowance and 1 ½” hem allowance

Supplies: 1.5 yards of Cone Mills denim (Indigo, weight unknown), $30.00, Threadbare Fabric; cotton scraps; thread, zipper from stash, $1.40

Total time: 8.5 hours

Total cost: $31.40

Gingers <3

I feel a little like the two-dimensional best friend in a romantic comedy (a love story between a garment sewist and a TNT). “When you find The One, don’t let go!”. For me, that’s this pattern.

If my math checks out, I’ve made 10 pairs of Gingers. I started sewing them before I started spreadsheeting, but I’ve given away at least 2 pairs (one pair got tight, I didn’t like the topstitching on another), completely unpicked and remade 1 pair (I didn’t like the topstitching on those either), cut 1 pair into shorts (no! The crotch seam started fleeing north, immediately and uncomfortably), tucked 1 into my giveaway bag (flares – I might get them on the blog before I re-home them), and I currently have a ‘denim drawer’ with 4 working pairs of Gingers and 4 pairs of Morgans. And now, these! We did it, team! Double-digit Gingers!

And as I’m wearing them in one-third of my blog posts it seemed like time to say something about them!

This pattern is terrible, don’t make it. (JOKING!)

I was initially terrified of sewing jeans (don’t be, I promise!) but I got wonderfully lucky with this pattern. My first version was the true skinnies and I graded between a 10 and 12 at the waist (a mythical size 11), and 14 at the hip. I used olive stretch twill and gold topstitching thread and when I first pulled them on I said “uh-oh” because I knew I couldn’t go back to RTW (this was also in 2014 or 2015, when mid-rise was high-rise and you could only find low-rise anyway). This is meant as a paean of gratitude, not a brag, but; things I did not need to do then, nor do I need to do now –

  • Any adjustments to the crotch curve
  • Any adjustments to the crotch extensions (I’m using the original version of the pattern, with slightly longer extensions that accommodate full thighs)
  • Any adjustments to the leg length
  • Any adjustments to the back rise
  • Any adjustments to the front rise

Is it surprising that I got hooked? I know I have wrinkles, but shoot, even though the olive twill pair grew too tight (RIP), I felt like a hot potato in my wedgie-free upper-mid-rise jeans! Plus, I only need 1.5 yards of denim or twill per pair, usually Cone Mills denim – a.k.a. The Good Stuff – which means a pair of jeans costs me on average $30 – 35. Actually, I can’t quit anytime I want, but also I don’t want.

The first pair of pants/trousers I made was actually the Colette Junipers, and I still wear them from time to time (mostly when I’m on my period, since the wide contoured waistband is very comfortable on a bloaty crampy period belly). Way back then I skipped the fly zipper, because fear is the mind killer, and used a side zip instead. So the first fly zip I sewed was actually on the Thread Theory Jeds. It went okay. But the first fly zip I loved to sew was on the Gingers!  

The directions are justifiably praised by many. I apply them to the majority of fly zips I sew and would recommend them, without hesitation, to a beginner. I also like that the fly is handled early in the sewing order, though I push it slightly later, and use it to divide my sewing into enjoyable chapters. First I sew short seams (pockets, back yoke), then the fly, and then long seams (inseams, outseams, waistband). Jeans are a satisfying, meaty sew, and I like having these natural stopping points as an option.

 You might notice there’s only one line of fly topstitching. I had two, but I enjoy an uncluttered crotch! Unpicking black thread on black denim is no joke, though. In more than one place, I snagged a denim thread instead of my topstitching thread, and once I accidentally caught and popped a thread right on the edge of the fly overlap. You can’t see any this (I hope) because I colored in any little white trouble spots with a black Sharpie. We’ll see what happens when I wash these.

I only use tonal topstitching thread now. I loved the thrill and challenge of high-contrast topstitching thread, and my heart yearns towards anyone’s gorgeous shot of on-point topstitching, especially in beautiful color combos (rust thread on blue! Grey on blush! Any color on grey! <3). But, I find that my jeans age better if I use tonal thread – it doesn’t show as much wear-and-tear and I get more years of satisfied use.  

I don’t interface the waistband, but I always use quilting cotton for the inner. It crumples with wear, but it’s comfortable to move in and stretches out less than self-fabric. I’ve been using this alternative waistband method for a while! I find I get neater results. Sometimes I remove the zipper teeth with pliers, as instructed (like a tiny fairy Marathon Man) and sometimes I just snip the zipper tape. Some of the jeans I’ve been wearing for years are pairs where I snipped the zipper tape. Tell no-one!

So somewhere, sometime, I got the impression that denim wrinkles are the enemy. That ‘true skinnies’ fit like a second skin. I haven’t attempted a really smooth fit, but I just made a belated but useful discovery: even when sewing skinny jeans, tighter does not necessarily mean fewer wrinkles. While wrinkles can indicate excess fabric, I think in my case they were indicating a lack of space (the way a pileup of fabric on your bum can indicate a swayback, or indicate that the fabric can’t fit comfortably over las pompas). On this pair, I added an extra ¼” to all outseams – leg, yoke, pocket pieces – and I think I have my smoothest fit over the hips yet. There’s extra space on my lower legs, but let’s just agree they’re stovepipes from the knee down! Viva la extra ¼“!

Hi, Gingers; I love you!   

—    

Pattern: Closet Case Ginger jeans

Pattern cost: NA

Size: ‘11’ waist, 14 hip, with ¼” added to all outseams (so ‘13’ waist, 16 hip?)

Supplies: 1.5 yards of 11 oz. Cone Mills S-Gene Denim in Black, Threadbare Fabrics, $24.20; 1/2 yard of Ruby Star Society Anagram cotton, Gather Here, $6; zipper, Sewfisticated, $2.80; thread, Michael’s, $1.90; rivet from stash

Total time: 7.25 hours

Total cost: $34.90

Look around you.

IMG_2657

Look around you!

IMG_2652

Have you worked out what you’re looking for yet?

IT’S QUILTING. No, I promise. It’s 10 hours of machine quilting that are FUNCTIONALLY INVISIBLE.

IMG_2513

This is M7549, an open, cropped, quilted jacket. I bought the pattern after being completely wowed by Allie J’s amazing take. I didn’t have the egg chutes to jump right into leather, but my initial plan was to sew it in metallic black linen for a similar girl-gang look (not so much inspired by as copied from), and then hopefully work up to a brown leather or suede version. I took myself to Gather Here for the first-try fabric and bought this Rifle Paper screen printed Cotton and Steel canvas instead! So a bit of a different direction!

IMG_2567

I’m really into it, though! Even though the cotton canvas ate my stitches (normally a feature I love) and the flannel I used for batting was too thin and my tonal thread was subtle to the point of irrelevant, it turns out I love the process of quilting garments! I marked my initial quilting lines on the right side of my main fabric with masking tape, after pin basting, so that I could center them on the shell pieces. I then marked the remaining quilting lines on the back of the flannel in pencil. I found the quilting process very Zen! For a first quilted project, the invisibility kept the pressure very looow, but my fabric still got stronger and warmer. V. satisfying. I quilted horizontal lines and diamonds, following the pattern.

McCall’s asks you to quilt great tracts of fabric and then cut your jacket pieces from those, but nuh-uh. I bought 2 yards total of this swish fabric (I’m not a railroad baron) and it was enough, enough even to avoid doubling in any obvious places.

IMG_2537

I had as much as was necessary to cut the inner yokes out of my main fabric, too, though I didn’t quilt those. I can’t imagine sewing lining fabric to lining fabric more than necessary, even though this is lined in my fancy vintage French Bemberg from my sister’s mother-in-law’s late mother’s Parisian attic.  I generally hate lining fabric but while still a little slippery and shapeless (every cut piece is happy to collapse into the shape of a blob and start fraying, oh joy) it’s a little sturdier than the contemporary lining I’ve tried. Plus it was free, as was my flannel batting; leftovers from another project.

IMG_2496IMG_2503

The structure is my favorite part. This jacket isn’t going to stand up on its own, but it’s got a little architectural something-something, I think! The silhouette + fabric choice feels a little matronly, but there are worse things than being a matron. The ideas I associate most strongly with that word are “high society” or “in charge of a lot of nurses”. Good stuff either way.

Construction zipped by quickly after all that quilting – so quickly, in fact, that I forget to make any changes, like adding a hanging loop and either inseam or welt pockets. I like the idea of pockets between the front jacket and front jacket bottom band. Also, if I make this again, I want to change the construction order, or maybe cut the facings as one wider piece. There’s a lot of fabric crammed into the corners of the front facing bands and I couldn’t for the life of me work out how to understitch the body to the lining. So I just said ah heck and topstitched the hem, facings and neck; it’s all quilted + imperceptible anyway.

If you, like me, have noodle arms, but again like me they are thick-cut noodles, take heart: the sleeve isn’t too narrow. I was worried about the three layers plus my upper arms, but they all live in harmony!

Sadly it’s a little snug across my upper back, but that only matters when giving a hug/walking like a zombie/flexing my traps (yes I had to look up which muscles are shoulder muscles).

IMG_2634

I’m wearing the jacket here with my second pair of Morgan mom jeans; I cut them with a little more SA than last time, but otherwise made all the same changes listed in my first post HERE.

IMG_2760

Look ma, no butt dimple!

Rifle Paper above and Rifle Paper below – my pockets coordinate with my jacket, sort of!

IMG_2521

Don’t worry, I’m wearing a Nettie. I can shuck several layers and remain fully dressed.

In conclusion: I like the jacket, I love the jeans, I send Anna Bond all my money, and my traps are stacked. Is that a thing?

IMG_2630

Buh-bye!

Pattern: M7549 cropped jacket

Pattern cost: $2.50

Size: 14

Supplies: 2 yards Cotton and Steel canvas, Amalfi; Gather Here, $34; leftover flannel for quilting layer, from stash; lining from stash; $3.58, thread, Michael’s (two spools!)

Total time: 14 hours

Total cost: $40.08

– – – – –

Pattern: Morgan jeans

Pattern cost: $0.00

Size: 12 waist, 14 hip

Supplies: 2 yards of Cone Mills denim, 9 oz., olive green, Imagine Gnats, $32.20; 1/2 yard Cotton and Steel quilting cotton, Gather Here, $6.00; hardware kit, Threadbare Fabrics, $5.65

Total time: 6.25 hours

Total cost: $43.85

Morgan mom jeans

“What do you call those?” my boyfriend asked.

“MOM JEANS!”

Mom jeans (6)

I was blind to the virtues of the Morgan jeans for a while (except for the regular Closet Case virtues of excellent drafting, clear directions, and a crotch curve that fits me like a dang soulmate), until I suddenly wanted mom jeans, and the only available pattern was Palmer/Pletsch. Really I wanted someone to have done that work for me, Mses. Palmer and Pletsch. And ideally that person would be Heather Lou, thus, Morgans! However, the rise on the Morgan jeans cuts right across my nice little tummy, and I needed to hike those bad boys up. So I took a page from Jasika Nicole’s book and added 2” to the rise at the lines marked on the pattern.

Mom jeans (1)Mom jeans (2)

That’s 2” to the front leg (extending the fly length as well), 1” to the back leg (I moved the pockets up, too) and 1” to the back yoke. Not surprisingly, I ended up with extra space through my seat and the small of my back. Even though my back dimensions tend to be broad instead of bodacious, I still regularly adjust for swayback. It was a little tricky to go back in and do the surgery, since my seams were already serged and topstitched, but I adjusted the pieces like the drawing below:

Basic RGB

Black lines are the original; red lines are where I trimmed. I removed about ½” from each side of the back center at top, tapered to nothing through the seat seam, and about ¼” each from the edges where the yoke and back meet, tapered to nothing at the side seams. I’m still getting some bubbling through my upper bum area. I might remove a smidgeon more fabric on my next pair. However, it could also be the way I went back into the jeans and adjusted everything – I may have stretched the seat out. Next pair will tell.

Mom jeans (8)

You can see the dimple of extra fabric here. Also the embroidery I added to the back pocket! This fabric was so much fun to embroider, sturdy but not tough; it’s the 9 oz. Cone Mills unsanforized denim in Mint, from Threadbare Fabrics (<3 Katie so much. I’ve ordered in haste before and she’s been such a sweetie about fixing my mistakes). The hardware is all from Threadbare, too.

This is my first pair of rigid denim jeans…ever? In my life? I sewed my first pair of unadjusted Morgans in stretch denim, because I was nervous. But the rigid denim is pretty darn comfortable! I like that they’re not clinging to my legs on hot days, and I’ve got a decent range of motion.

Mom jeans (3)Mom jeans (5)

(Boyfriend/ photographer: “Do a lunge! That’s not a lunge. Okay, now touch your toes.” Me: “I can’t! My glasses will fall off!” #naturalathlete)

My thighs spread a lot while sitting, so they’re a big snug in repose. I could use another ¼” in the outer leg. Next time! And yeah, there’s definitely a next time! These aren’t traditionally flattering, in the sense that they don’t make me look smaller/longer/narrower, but getting tiny is not on my to-do list (even if it would help me fit in swants!).

Mom jeans (7)

My big rivet doesn’t match my little rivets. Ssh!

Mom jeans (9)Mom jeans (10)

Lots of under-butt wrinkles, but I need them for getting low. Or as pictured here, getting medium.

Mom jeans (11)

Cuffs, of course! I remember how paranoid I used to be about wearing high-water pants in high school. Fashion, you’re fickle. We’re friends though. And friends never let low-rise come back, right?!

Pattern: Closet Case Morgan jeans

Pattern cost: N/A (I only count the cost the first time I use a pattern)

Size: 12 at waist, graded to 14 at hip

Supplies: 2 yards of Cone Mills denim, 9 oz., mint green, Threadbare Fabrics, $36; denim hardware kit, Threadbare Fabrics, $6; embroidery threads and hoop, Michael’s, $3.32; ½ yard Liesl Gibson lawn, pocketing, Gather Here, $4.60; thread from stash

Total time: 11 hours

Total cost: $49.92